Directory configuration
Activating the Directory feature
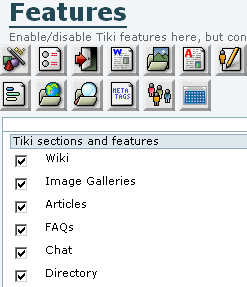
![]() The Directory feature is activated on the Admin > Features page (tiki-admin.php?page=features).
The Directory feature is activated on the Admin > Features page (tiki-admin.php?page=features).
To enable the Directory, check (tick) the box for Directory and click Change preferences.
Directory Configuration
![]() The overall Directory configuration is set on the Admin > Directory page (tiki-admin.php?page=directory).
The overall Directory configuration is set on the Admin > Directory page (tiki-admin.php?page=directory).
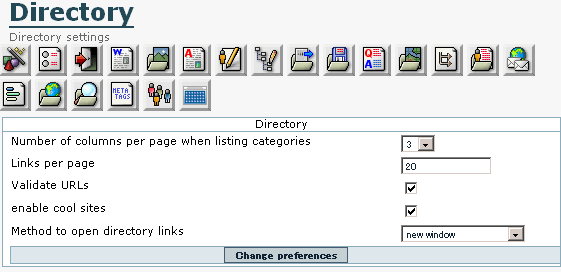
These are the settings to specify:
| Field | Description |
|---|---|
| Number of columns per page when listing categories | Select the number of columns (from 1 to 6) in which to display the directory categories. The Directory categories can be displayed in one long list (a single column) or in up to six columns. |
| Links per page | Specify the number of directory entries to display, per page. After Tiki displays the specified number of links on the first page, it will direct the user to additional pages of links. |
| Validate URLs | This is enabled to require links submitted by users to be validated (approved) by an admin or editor prior to being added to the Directory. If submitted links are to be immediately entered in the Directory without first being validated by an admin or editor, this should be left unchecked. Like other Tiki permissions, the authority to validate Directory links is given on a group basis. To enable others to validate links, the appropriate permission — tiki_p_validate_links — must be given to a Tiki user group on the Admin > Groups page (tiki-admingroups.php) (see Permissions). This group is then indicated when the Category is added or edited. |
| Enable cool sites | This puts the cool sites link on the Directory navbar and activates the "Directory ranking" page, which lists the most-visited sites in the Directory in descending order. |
| Show country flag | Specify if the country flag is shown for each directory item. This option was introduced in Tiki 2.0. |
| Method to open directory links | Specify how Tiki links to each item in the directory: Replace current window: Close the Tiki window and open the linked site in its place. Open new window: Put the Directory page in the background, but keeping it open Inline frame: Display the linked web page in Tiki's center column |
Directory Administration
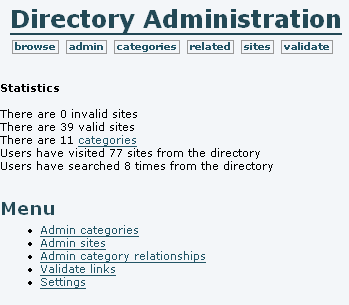
To open the Directory Administration page (tiki-directory_admin.php), go to the Application Menu and select Admin directory from the Directory menu items. (See screenshot below.)
The top navigation bar of the Directory Admin page contains these links:
- browse - Browse the Directory.
- admin - Admin the entire Directory.
- categories - Admin Directory categories.
- related - Admin Directory category relationships.
- sites - Add, delete or edit sites.
- validate - Validate links submitted by users.
The admin links in the navbar (which is displayed on all Directory pages) are repeated in the admin menu at the bottom of this page, perhaps with a settings link to the Tiki Admin > Directory page (tiki-admin.php?page=directory), depending on the viewer's permissions.
Tiki maintains several Directory statistics:
- There are _ valid sites - The number of valid (approved) site links. These are the links that are active in the Directory. ("Valid" doesn't necessarily mean that a link works without errors, but just that it has been accepted for use in the Directory.)
- There are _ invalid sites - The number of links that have not been validated (approved) by an admin or editor.
- There are _ categories - The number of categories. These are specific to the directory and are not the same as Tiki Categories (see Category), though they can be "Categorized" and thus come under one or more global Tiki Categories. This stat contains a link to the Admin directory categories page.
- Users have visited _ sites from the directory - The number of clicks by users on Directory links to other Web sites.
- Users have searched _ times from the directory - The number of searches made in the Directory
Category management
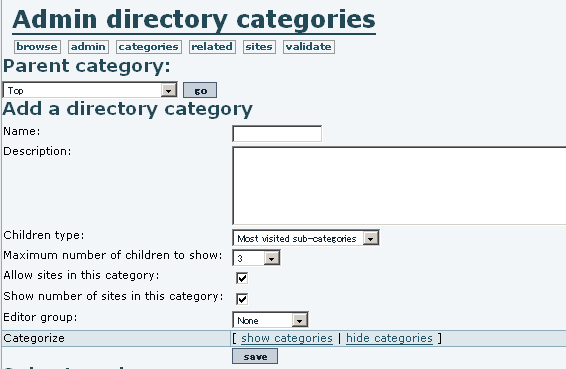
Clicking on categories opens the Admin directory categories page, which displays the Parent category (a drop-down list), a form to add a new category, and a list of subcategories under the current parent category.
Note that categories are arranged as parents and children. Above all the child categories is the Top category. You can create subcategories under the Top category or any other category by first selecting the category as the Parent category, using the drop-down menu. Then, complete and submit the Add a directory category form to make a new child category under this parent.
The options are:
- Name - Category name
- Description - Category description
- Children Type- When browsing the category tree a line of text will be displayed below the category name. You can choose what goes in this line: the most-visited subcategories, the category description, or random subcategories.
- Maximum number of children to show - Once you decided what will be displayed below the category you can set up how many items will be displayed. You can choose none to eliminate the line below the category name. Note that if you decide to show the category description this option has no effect.
- Allow sites in this category - Whether sites can be added to this category or not. You might prohibit sites in a category if you only want to use it to contain other subcategories.
- Show number of sites in this category - If enabled the number of sites in the category will be displayed next to the category name.
- Editor group - You can indicate a Tiki group that will have admin permission for this category. These editors will be able to validate sites.
- categorize - In addition to the categories of the directory, Tiki also uses global categories that apply to all objects within it. This option allows you to put your directory category within a Tiki category. To do so, first click show categories to see which Tiki categories are available (as has already been done in this screen shot). Select the appropriate categories and check categorize this object. See Category for more information on Tiki categories.
At the bottom of the Admin directory categories page is a list of directory subcategories for the parent category indicated by the drop-down menu at the top of the page.

Its columns indicate how a sub-category was configured with the Add a directory category form:
- name -In this example, four names are shown.
- cType -Children type (d = description in this example).
- view -Maximum number of children to show.
- allow - Allow sites in this category.
- count - Show number of sites in this category (number of sites in parenthesis).
- editor - Editor group. In this example, a group named editor has been used.
- action - Buttons to relate, edit, and delete categories, respectively.
Related categories
In addition to a category being able to contain other categories, it can also be directly related to another. This is useful when, for example, there is some logical connection between categories and a person browsing one category would benefit from seeing the other. The related category link functions as a "See also..." reference.
Clicking on related displays the Admin related categories page.
To create a relationship between two categories:
- Select a Parent category from the drop-down list. In this instance, "Parent category" is rather a misnomer here; it simply means the category for which a relationship is to be assigned.
- Select the to-be-related category from the Add a related category drop-down list.
- Check mutual if the relationship is to be indicated from both categories (A=>B, B=>A) or leave it unchecked for an unrequited bond.
- Click the save button to create the relationship.
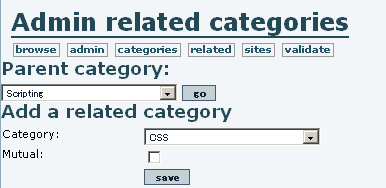
Under Related categories, you will see a drop-down list of the categories that are related to the selected "parent category". Relationships can be updated or removed here.

Admin sites
Click on sites to display the Admin sites page.
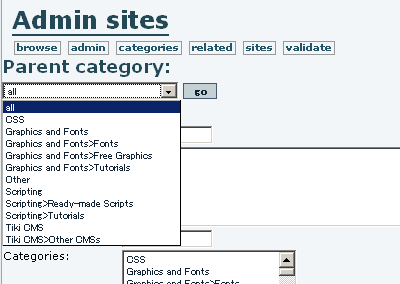
The Parent category drop-down menu includes all categories in the Directory that can contain sites directly. (A category for which "contain sites" was not checked will not appear in this list.) Selecting "all" displays all sites, in the table below; selecting one of the categories displays the sites in that category.
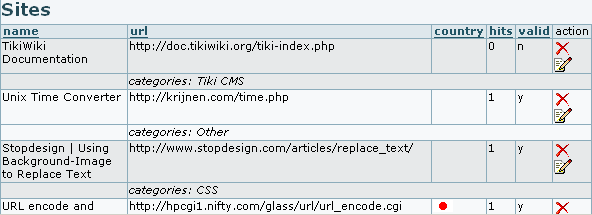
To add a site, enter the appropriate information for the site in the Add or edit a site form. To edit a site, click its edit icon. Note that a site can be added to more than one category by control-clicking each desired category. (The Parent category selection at the top of the page determines what appears in the Sites section of the screen. This selection has no effect on the information input when adding a new site.)
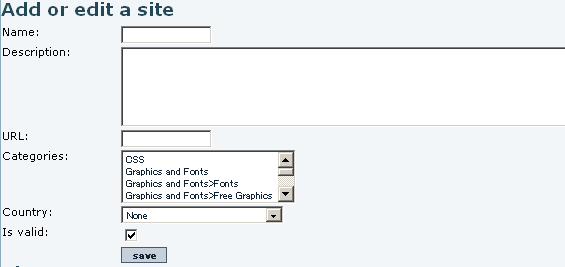
Site Validation
Clicking on validate will display the Validate sites page, where user-suggested sites are "validated" (approved for inclusion in the Directory — "valid" here doesn't refer to the actual validity of the linked URL).
To validate one or several sites, check the appropriate box(es) and click the validate button. A similar technique will do mass "invalidations" (removals from the Directory). Click the edit icon ![]() to edit a site or the delete icon to remove one.
to edit a site or the delete icon to remove one.
