Loading...
 

Top Bar

This is a new document and Needs Review.


For more information how to configure the identity of your site see: Look and Feel.

What is the Top Bar?

Originally, at the top of Tiki sites, there was a rectangular area a single text line high containing the Tiki version info, the date and time, and a search form. Later the Tiki info was moved to the page footer, the date was removed and a horizontal menu was added.

In a few Tiki releases, turning on the Top Bar also activated the other site identity items at the top of the page such as the logo and banner ad space, but these areas are now available by default; there's no "Top Bar" master switch for them.

As of Tiki 3(?), the Top Bar typically contains a horizontal menu and a search form (and possibly "breadcrumbs" links).

Activating the Top Bar

  • Go to Admin panel >> feature Look and Feel (tiki-admin.php?page=look) >> tab General Layout options and click checkbox Top Bar on.
  • To place a navigation menu in the top bar, activate the checkbox Site Menu Bar.
    • Note : This feature also requires CSS menus or PHP Layers menus to be turned on in: admin panel >> General >> Navigation. (Choosing CSS menus is recommended, since PHP Layers menus will be phased out of Tiki perhaps in release 6, and most new themes no longer provide CSS styling support for them.) Alternatively, as of Tiki 5, there is a "site menu custom code" textarea, in which HTML links, or Tiki menu syntax, or logic to display one of several menus according to some condition can be entered. In displaying the page, custom menu code is checked for first, then CSS menu syntax, and then PHP Layout menu syntax.
    • Example custom site menu code
      Copy to clipboard
      Example: {if isset($objectCategoryIds) and in_array(2, $objectCategoryIds)} {menu id=43 css=y type=horiz}{else}{menu id=44 css=y type=horiz}{/if}

Older information

Note: The page content below is rather old but could be useful as an example of what can be put in the site menu custom code form.

Example for Using the Top Bar for a Site Logo with a Navigation Menu

  • Create a horizontal navigation menu you would like to use for the top bar.
    • For information how to configure this menu see : Menu.
    • Placing the different items (for example the title of your site, an image and some links) in the positions of this new menu, you can define the style of each one by using html in the menu option name.


For other example, how to use the Custom Site Header instead of the Top Bar see : Custom Site Header and Look and Feel.

Example for your Site Title :

Copy to clipboard

Your Site Title


Example for your Site Logo :

Copy to clipboard


Example for each Navigation Button :

Copy to clipboard

Articles

  • Look at the ID-number of this new created menu (e.g. id=46) and fill in the number in the field menu id of the top bar section.

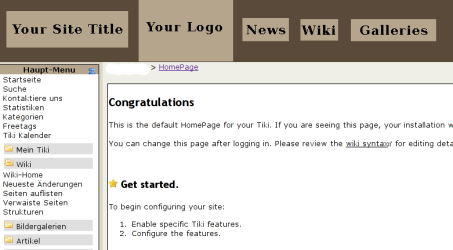
  • Now you will see something like in this screenshot:


Image

Showing Different Module Collections after Clicking on each Navigation Button

Creating some more different User Menus for each feature-area (articles, wiki, gallery, trackers etc.) and setting specific permissions to this menus (integrated in modules) according to your user groups, you can now let appear a different collection of menus (on the left or right side) after a user has clicked on one of the navigation buttons.

  • How to create different menus and assign them as modules to specific user groups see : Menu HOWTO and Module Admin.

Adapting the Appearance of the Navigation Buttons According to Activated Features and User Permissions

Combining the information you enter in the option-fields of each position of your navigation menu, there is the possibility to control the visibility of each button as well depending on the user's rights as if the feature is activated under admin panel >> features at all.

Examples :

  • Add feature_articles in the field Sections of your menu position which is linking to articles.
    • So the navigation button Articles will only be visible if the feature articles is generally activated.
  • Add tiki_p_read_article in the field Permissions.
    • So the navigation button Articles will only be visible for users which have via their group the permission to read articles.
  • Select from the field Group the ones you want to be able to see the area.
    • So the navigation button Articles will only be visible for users which belong to one of the specified groups.


For detailed information how to configure such a menu see: Menu.

Note :

  • According to your module permission settings as well as the configuration of each from the navigation buttons linked user menu the visible buttons will place always one next the other similar to if they were floating left.

  • In this way users without permission to see an area even won't recognize there are more buttons except those they actually are permitted to see.

List Slides