Newsletters Admin
Overview
Setting up newsletters requires the following steps.
- Enable the newsletters feature.
- Check your group permissions to ensure that your subscribers can use the newsletters function.
- Create a newsletter (name it).
- Configure your newsletter.
- Send a subscribe request. (If you have "validate emails" checked)
- add a newsletter.css to your styles/yourtheme folder.
- Create the "first edition" with html or wiki syntax or plain text.
- Send.
1.1. Enabling the Newsletter Feature
Logged in as Admin, select Admin Home, and click on Features
Select the Newsletters checkbox and click on the Change Preferences button at the bottom of the page. You should now see Newsletters as an item on your Application Menu, like this:

Or if you aren't using the application menu use:
example.org/tiki-admin_newsletters.php
1.2. Creating newsletters
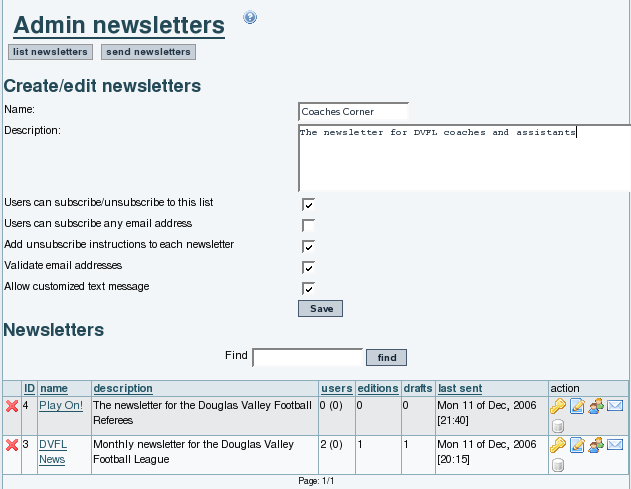
You can create a newsletter from clicking the Admin Newsletters link in the newsletters section of the application menu. This opens the Admin Newsletters screen. Here's a view of that screen:

The options below the Newsletter name and description control how the newsletter is distributed.
| Checkbox | Effect |
| Users can subscribe/unsubscribe to this list | If this box is checked,users can subscribe and unsubscribe withour admin intervention. If it's not checked, the admin controls the subscriptions to this list. |
| Users can subscribe any email address | If this box is checked, the user can use any email address for their subscription. If it's not checked, the user must use the address from their Tiki user record |
| Add unsubscribe instructions to each newsletter | If this box is checked, a block of text with instructions on unsubscribing is included in each newsletter |
| Validate email addresses | If this box is checked, an email will be sent to each new subscriber containing a special link that must be clicked to complete the subscription |
| Allow customized text message | If this is checked, you will be able to add a custom block of code that appears in each newsletter. This can be used for marketing messages or other boilerplate text. |
1.3. Changing Existing Newsletters
The area below the creation section shows a list of newsletters already created. The icons on the far right allow you to change each newsletter's settings:
| Change newsletter permissions | |
| | Edit Newsletter Information |
| | Subscriptions |
| | Send Newsletter |
| | Newsletter Archive |
| | |
You can define templates for newsletters using the content templates system and then selecting the template from the send newsletters screen.
The From name is defined by the field "Sender Email" in the admin panel.
1.4. Add emails to a newsletter from a list in a wiki page
You can now add emails to a Newsletter from a list of emails in a Wiki page, so that the contents of that wiki page, whatever they are at the time, can be used to define emails to which an individual Newsletter Edition is sent.
That list can be manually edited (one email per line) or it can be dynamically fetched from a tracker dataset, through the PluginTrackerList and using Pretty Trackers.
Example:
Page: Recipients
{trackerlist trackerId="2" fields="32:33:34" filterfield="32" filtervalue ="%" wiki="recipients_template tpl"}
Page: recipients tpl
{$f_33} {$f_34} <{$f_32}>,
The email tracker field (fieldId 32 in this example) needs to be set as plain text (option 0) for the newsletter to be able to fetch the email address from the page.
Then add Recipients as the "Import emails from wiki page" on tiki-admin_newsletter_subscriptions.php to add them now, or "Use emails from wiki page" to add the contents of the page at newsletter sending time.
1.5. Styling an HTML Newsletter
From Tiki 6.1 the quantity of 'styling' information embedded within an HTML formatted newsletter can be controlled by the use of a dedicated css file. If newsletter.css exists in the /styles/yourtheme/ folder, this css file is used to format the newsletter. If a style option is used then a different newsletter style can be used, reflecting the style option, by placing the different newsletter.css file in the /style/yourtheme/options/youroption/ folder.
From Tiki14, with the new bootstrap theme architecture, placement of the newsletter.css has changed - from this version onwards the customised newsletter.css file should be placed in either the /themes/yourtheme/css/ folder or the /themes/yourtheme/options/youroption/css/ folder.
If a newsletter.css file does not exist the styling information is derived from the full theme used by the site - but it should be noted that this can result in an overly large email file and can have a critical impact. On Gmail your newsletter will be clipped on several other (local) mail services it appears that the content will be simply ignored (blank newsletter). It is therefore advised to have your own newsletter.css file even if empty.
1.6. Reduce the speed of sending emails (Throttle)
Since Tiki9 (or some earlier version, maybe) you can reduce the spreed at which emails are sent, through a prefference in "Admin home > Performance > Newsletters (tab)":
"Throttle newsletter send rate"
You can also specify:
- Newsletter pause length (in seconds)
- Newsletter batch size
Example
Imagine that you need to send a newsletter to 600 emails, but your hoster has some email sending limit of 200/hr.
You would need to set, for instance, a pause length of 60 seconds and a batch size of 3 emails in each batch. That would be 180/hour.
The 600 sends would then need 3+ hours.
1.7. Check the newsletter log
Each newsletter saves a log of the process in your ./temp/public/ folder, with a name like newsletter-log-NN.txt
NN stands for the correlative number of the newsletter edition that was sent